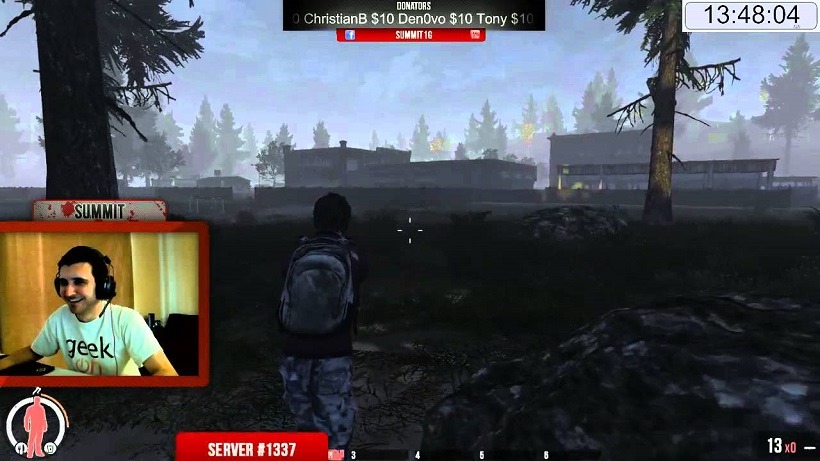
Streaming has been a hot topic in the Lazygamer office as of late. As more and more people enter the age of first world internet streaming is now becoming a possibility for those who can afford it. While many options currently exist, streaming infrastructure comes in all shapes and sizes. From LTE to Fibre at home, your next step is choosing the easiest, best and most affordable streaming software. Usually I’d recommend going straight to Xsplit, but with the current exchange rate you will be looking at roughly R400 a month, so let’s speak to our wallets instead and stick with Open Broadcaster Software Project, or OBS.
Often, gamers who have been lucky enough to stream their gaming content have asked me to help them set it all up, and today I’m going to offer you a rather in-depth guide on easy set, and quick streaming.
First things first, you’ll need OBS, so get downloading.
Introduction
OBS Project is relatively easy to use. The application opens on a home screen which is where you edit your scenes and are able to view your production. These are pretty easy to figure out and it’s best you do that alone as it will give you a better understanding of the front page where you will do most of your editing. You’re able to add an array of media to your scenes. My only advice is you can never have too few scenes if you’re looking to change between what is seen on your live stream.
Just a few important scenes I’ve always placed on my panel:
- AFK Screen – This is the screen you pop up prior to going live. It’s best you hotkey this as well as making sure your mic is hotkeyed as well.
- Camera Screen – This is the scene you put on when you want your audience to see your beautiful face, it can be a framed border to include social media, sponsors, etc.
- In-Game Screen – Naturally the scene which shows what you’re playing.
- Adverts – If you’re a sellout and have adverts for sponsors and stuff, this is also a great scene to have.
These are just a few tips for getting started, now we need to get to the hard stuff.
Step One – Encoding
Encoding relates directly to your bandwidth and the quality of your stream. Here you set your bitrate, which is a common mistake among new South African streamers. Firstly there are a few things to note, especially if you’re streaming to Twitch. If you’re streaming to YouTube, just skip ahead.
Twitch has a partnership program which gives partnered streamers access to transcoding. In laymen’s this means people are able to select in what quality they want to watch your stream. Naturally first time streamers will not have this enabled, unless you get over 100 viewers, but let’s just assume you’ll be streaming to a smaller audience.
As you pan over the Encoding settings, these are the optimal settings you need to have:
- Make sure both “Use CBR” and “Enable CBR padding” is ticked.
NB: The Max Bitrate (seen below) directly relates to your upload. The higher your upload, the higher you can set it.
The following Bitrates showcase the quality you will be streaming in:
- To stream in 360p you’d need a Bitrate of 600-800 (Ideally a 1mbps stable upload)
- To stream 480p* you’d need a Bitrate of 900-1200 (Ideally a 2mbps stable upload)
- To stream in 720p you’d need a Bitrate of 1800-2500 (Ideally a 3mbps stable upload)
- To stream in 1080p you’d need a Bitrate of 3000-3500+ (Ideally a 5mbps stable upload)
*Since South African internet is not that great, I’ve always recommended that streamers starting out should stream at 480p since it caters for a wider audience with not-that-great internet. This is seen as medium quality if configured correctly.
Your buffer size should be equal to whatever your Max Bitrate is. Audio Encoding is not as important as the video settings, but for optimal audio output you’d want a Bitrate of 128 (which is standard) with the AAC Codec.
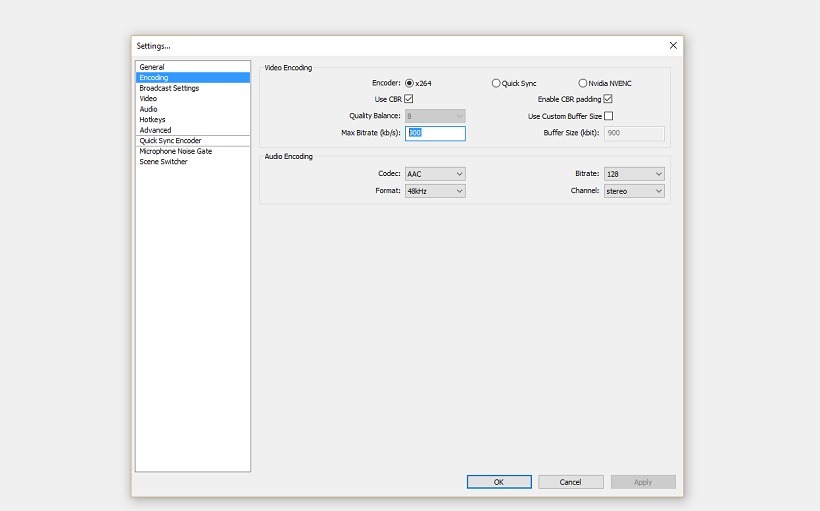
These are the optimal Encoding settings for broadcasting in 480p, preferable for a South African audience.
Step Two – Broadcast Settings
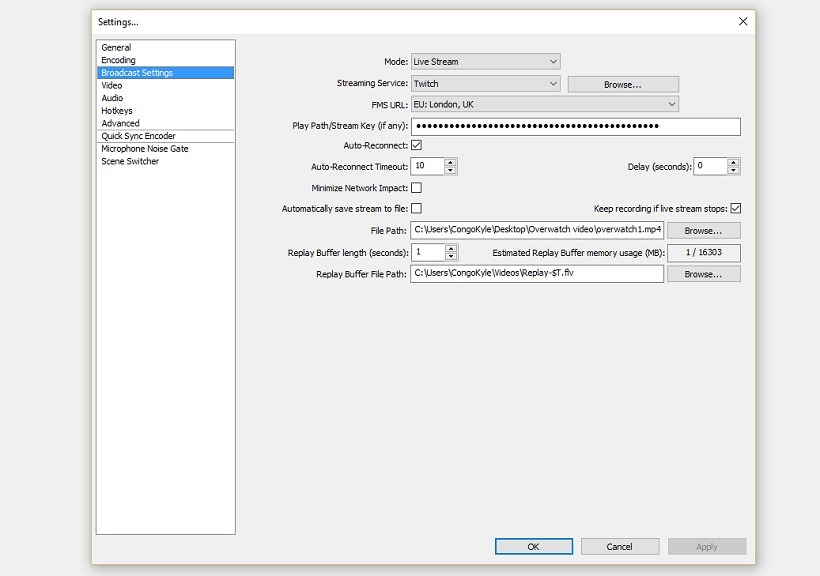
The Broadcast Settings are specific to what it is you’re actually doing with OBS Project. OBS Project is great for streaming to Twitch, YouTube, Dailymotion, Hitbox, etc. but it’s also can be used to locally record content as well. Once again, these are the optimal settings starting from the top.
- Mode:
- There are only two options here: Live Stream and File Output Only. Your live streams can be set to automatically locally record your live stream session, but if you wish to only record gameplay and later upload it, you can enable the File Output Only which is great for YouTube.
- Play Path/Streamkey:
- This is where you will output your stream, a dedicated path. Twitch offers a unique stream key which you can access from your profile by going to twitch.tv/YOURUSERNAME/dashboard and navigating to the Stream Key tab. Copy paste your path in the box and there you have it. Test it prior to streaming to insure it’s in fact streaming to your channel.
- Streaming Service:
- Here you can select your streaming service from a list of providers, the most popular being Twitch, YouTube and Hitbox. For the sake of this guide we’re going to assume you’re using Twitch, and carry on.
- FMS URL:
- This is the server you’re going to be streaming to. The recommended ones are London, Frankfurt or Stockholm (all based in EU), but I’d recommend doing a speedtest to these regions and seeing which one gives the best latency, as this would be the best server to use.
- Saving your file:
- If you don’t want to automatically upload your video from Twitch to YouTube, you can locally record your stream as well and upload it later with some editing, or cut a few scenes for highlights. Here you can select your file path (as I’ve done below) and store it locally.
The rest of the settings are default, so you need not mess with those. However, if your internet is prone to disconnects and you know how long it takes to reconnect you can alter your timeout.
Step Three – Video
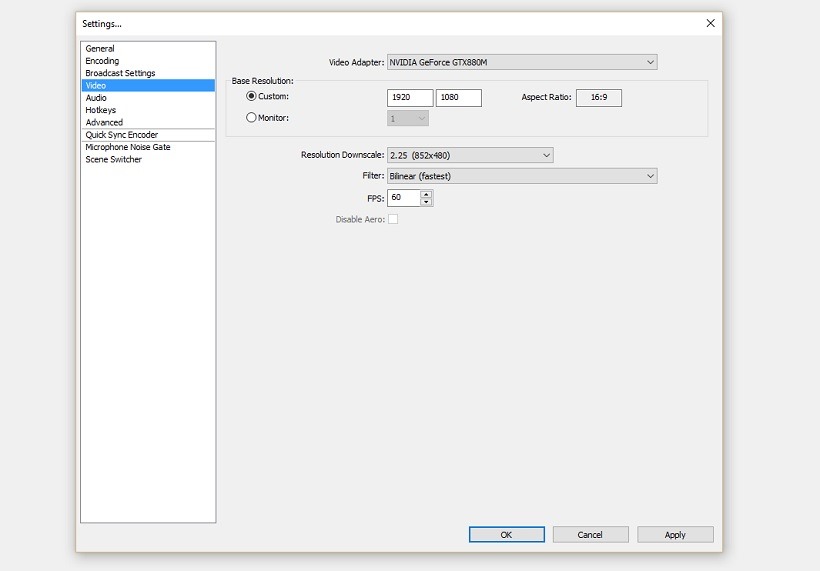
Video is pretty straight forward. This is just the resolution you’re streaming at, but there is one really crucial component to consider on this tab if you’re: firstly, using less than favourable South African internet, secondly, wanting to cater to a South African audience.
Under Resolution Downscale I’ve often recommended that streamers downscale their resolution to match their Bitrate. For example, if you’re catering for a local audience you can downscale it to 2.25 (as seen below) which is 852×480, thus 480p. The other options are:
- None – Streaming to 1080p (1920×1080 or whatever your native resolution is)
- 1.50 – Streaming to 720p (1280×720)
- 2.00 – Streaming to 540p (960×540 which is still watchable for a large majority of South African viewers)
- 2.25 – Streaming to 480p (852×480 recommended)
The FPS is standard at 30, but if you have a powerful enough PC you can push it up to 60 fps which makes it a lot smoother, especially at lower resolutions (though at a bandwidth penalty).
Step Four – Audio
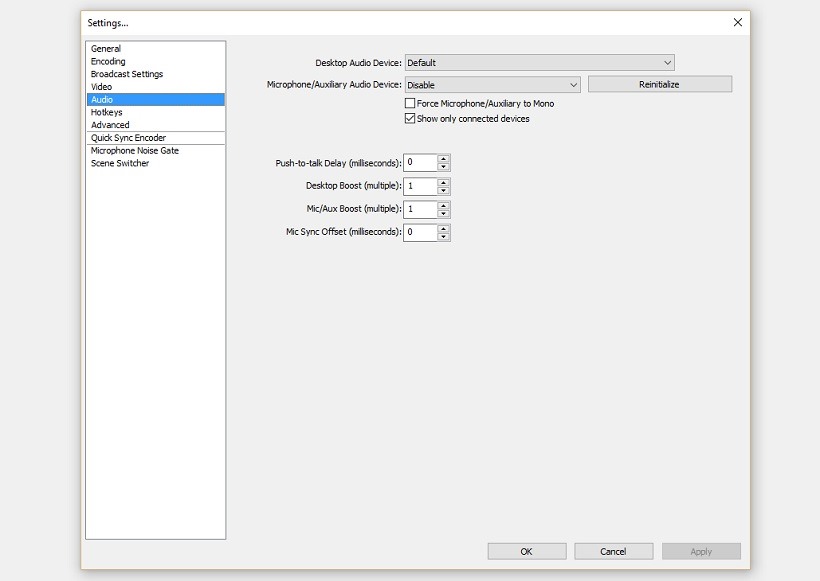
Audio is pretty self-explanatory. Just ensure you have your default devices selected, else you won’t have any audio at all. There’s also a boost function which you can mess around if your microphone is too soft. I’d recommend boosting it first through Windows (or third-party software if your microphone uses it). These are my default settings and it has never served me wrong.
Step Five – Advanced Tab
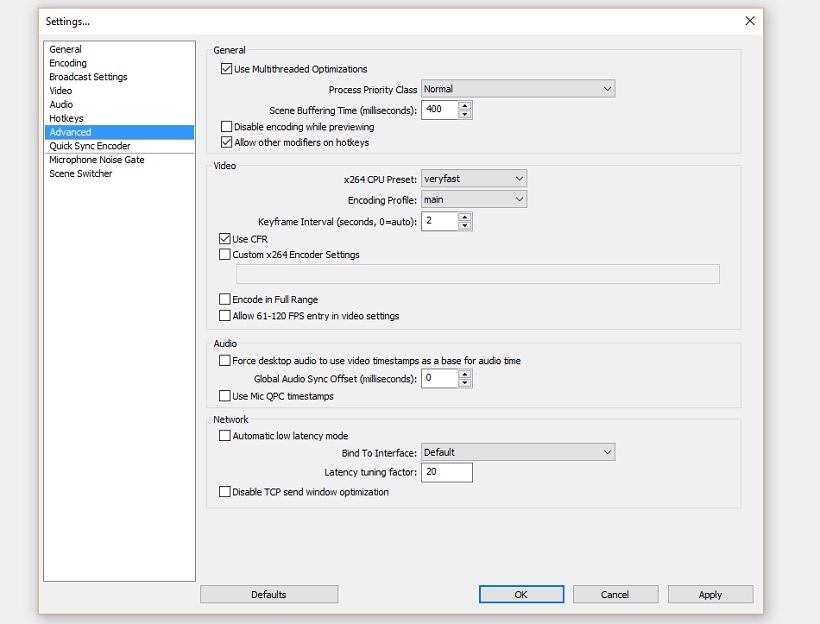
Often you may get a warning saying your stream is not optimized for Twitch. This is where you head to the Advanced tab to make sure it’s all in order. OBS will automatically tell you what needs to be changed, but to make it easier for your I’ve included my settings below which will insure you’ve got the correct advanced settings. Naturally some can changed if you’ve got a better machine, or unlimited Bandwidth.
And that’s it, you’re good to go. You’re more than welcome to play around with the other settings, but what I’ve included above are the crucial settings to get you started. There are of course more in-depth guides available, but this is the quickest guide you need to start streaming. If you’re already a streamer, or toy around, drop us a link and we will check it out.
Happy streaming, friends!
Last Updated: January 14, 2016







Alien Emperor Trevor
January 14, 2016 at 14:33
Wow. Not what I was expecting at all. Back in my day OBS stood for Old Brown Sherry.
Kromas untamed
January 14, 2016 at 14:54
Step 1: Drink massive amounts of OBS
Step 2: Burp or at least think you were gonna burp and let the OBS stream out of you.
😛
Spathi
January 14, 2016 at 14:55
Die “Ou Brakpan Staatmaker”
Hammersteyn
January 14, 2016 at 14:56
LOL!
Umar
January 14, 2016 at 14:38
I thought this was a guide on how to stream from obs, as in observatory in Cape Town. I’m disappointed.
Alien Emperor Trevor
January 14, 2016 at 14:44
That was my second guess!
VampyreSquirrel
January 14, 2016 at 14:53
OBS is surprisingly easy to use once you learn the basics of getting around it.
RinceThis
January 14, 2016 at 14:55
If this was about OBS and how we could watch people throwing things at Trevor then I’d read it all but alas…
VampyreSquirrel
January 14, 2016 at 14:56
“The recommended two are London, Frankfurt or Stockholm” TWO… yep that’s two.
http://previews.123rf.com/images/design56/design561108/design56110800647/10412120-Child-hands-showing-one-two-and-three-fingers-Stock-Photo.jpg
Hammersteyn
January 14, 2016 at 14:57
6?
VampyreSquirrel
January 14, 2016 at 15:02
YES!
Kromas untamed
January 14, 2016 at 14:57
Reverse Valve Math.
Alien Emperor Trevor
January 14, 2016 at 14:57
Clearly he meant “London AND (Frankfurt OR Stockholm)” 😉
Hammersteyn
January 14, 2016 at 14:57
Finally, people can see me online! I’ll mail the links tomorrow!
Kromas untamed
January 14, 2016 at 14:59
Naked streaming gets banned fairly quickly so you may want to maximize viewers before you start. 🙂
Hammersteyn
January 14, 2016 at 15:23
Wont be on Youtube
Jim Lenoir (Banana Jim)
January 14, 2016 at 16:52
“This is how I game, bros… naked balls to the wall”
Gavin Mannion
January 14, 2016 at 15:02
Thanks Kylie… this explains why my OBS stream was so bad, I had set my bitrate way too low
VampyreSquirrel
January 14, 2016 at 15:04
Set it too low, and you drop frames like they’re HOT.
RinceThis
January 14, 2016 at 15:06
for the shizzle
Gavin Mannion
January 14, 2016 at 15:07
mine was set to like 100 or something… the stream was so bad
Lord Chaos
January 14, 2016 at 15:31
I thought you were streaming while drinking sherry. 🙁
Jim Lenoir (Banana Jim)
January 14, 2016 at 16:50
And bookmarked… like a Sir Juice!
http://www.sirjuice.co.za/uploads/downloads/pack-shots/1_sj-angle1/rgb.jpg
Gerhard Davids
January 15, 2016 at 10:26
The bitrate situation is not that simple.
It depends on how fast your contents move to be honest.
You can play Hearthstone with a much lower bitrate with good quality, then have a completely blocky jaggy mess when playing and FPS with the same settings.
RandomMaster
January 15, 2016 at 11:57
I have a lot of fun streaming myself. Lucky to get 1 or 2 viewers but I still love doing it 😀
ghostR
January 15, 2016 at 15:34
There are a few other bit rates options that people can use. Since its pretty hard to get over 3mbps upload speed in the country. The below is taken from a well known twitch streamer.
1.) 540p (960×540), 30fps, 1600kbps, Very Fast
2.) 540p, 30fps, 1600kbps, Fast
3.) 540p, 60fps, 3200kbps, Very Fast
4.) 720p (1280×720), 30fps, 2000kbps, (this is generally where most SA streams start (with 2-3mbps speed)
5.) 720p, 30fps, 2800kbps, Very Fast (this already hits the limits of SA speeds).
I have also seen a few streamers push 720p (1280×720) 30fps with 1500kbps. Although high action games like CS:GO will cause problems.