Your passport photo may end up looking worse than you thought. And this is not happening because you are “unphotogenic,” but because the format is engineered for biometric precision, not aesthetics. Strict rules, harsh lighting, and forced neutrality combine to flatten features and amplify every shadow.
The good news: once you understand why it happens, you can control the result. Without breaking any official requirements!
The “mugshot effect”: why the system works against you
The government enforces strict and standardized requirements for the accurate working of facial recognition. This is why you are asked to turn your face towards the camera directly, maintain a completely neutral expression, stand in front of a plain light background, and not wear any accessories unless there is a medical or religious reason.
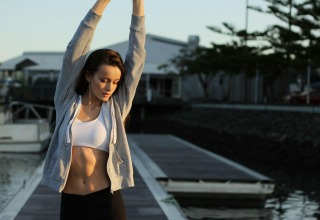
Facial Expression Essentials for Passport Photos
From a security standpoint, it makes sense. From an aesthetic standpoint, it’s brutal.
All the tricks that make portraits look good (slight angles, soft expressions, dimensional lighting, a hint of personality) are stripped away. What’s left is a flat, evenly lit, emotionless image that prioritizes symmetry and visibility.
Harsh lighting exaggerates everything
Most passport photo booths rely on harsh overhead or circular fluorescent lighting that surrounds the face from every angle. Unlike studio portraits that use large, diffused softboxes to sculpt features gently, booth lighting is blunt and unforgiving. It casts shadows directly under the eyes (the “raccoon” look) while accentuating the skin texture and reducing the facial contours. The face may end up looking two-dimensional, with noses and chins appearing more prominent than they are in actuality. Fluorescent lighting is also cool and high-contrast, which can have a draining effect on the skin tones.
But the technical setup is only half the problem.
The psychology of the bad shot
A passport photo session may last only a few minutes, yet it carries surprising psychological weight. You know this image could represent you for the next ten years. That quiet pressure alone is enough to trigger subtle physical tension. The jaw tightens, the shoulders creep upward, and the neck instinctively pulls back slightly (a reflex sometimes called “turtling”). Lips press together just a little too firmly. These micro-adjustments may feel insignificant, but cameras are ruthless amplifiers of muscle tension. A slightly clenched jaw can harden the entire expression.
Then there’s the no-smile rule. Smiling naturally engages the muscles around the eyes and cheeks, bringing lift and vitality to the face. When you suppress that engagement completely, you may look flatter, even gaunt. And that’s not because you look that way in person, but because the subtle movements that communicate warmth and aliveness are switched off.
Trying too hard to comply creates another common mistake. In an effort to avoid blinking, many people open their eyes wider than usual. Instead of appearing neutral, they look startled. The under-eye area becomes more visible, and the gaze can feel slightly strained.
By the wat, “neutral” does not mean “frozen” or “wide-eyed”. It means relaxed, balanced, and at ease. And that’s surprisingly difficult to achieve when a camera, bright lights, and a decade-long commitment are staring back at you.
Passport photo hacks that actually work
The easiest way to upgrade your passport photo is to abandon the booth and control your photoshoot by yourself. You will only need a smartphone and someone to take a picture of you, or even just a tripod. To edit the size and background, you can later use specialised online tools like Visafoto.
The best part of this method: instead of taking a couple of shots and hoping for the best, you can capture a series of images. Small, almost invisible adjustments in posture, while keeping your head straight and compliant, can subtly change how shadows fall across your features. Shooting in short bursts gives you more options.
Lighting matters!
Stand facing a window on a cloudy day or in soft, indirect daylight, and position yourself so the light falls evenly across your face from the front. This kind of illumination is naturally diffused and far more forgiving than artificial sources. It reduces under-eye darkness, and makes skin look more natural without violating any official rules.
A simple but powerful upgrade is adding a makeshift reflector under your chin. A white sheet of paper, a light-colored towel, or even a white T-shirt held just out of frame will bounce light upward and soften shadows beneath the eyes and along the jaw.
Pose like someone who understands the camera
You’re not allowed dramatic angles or big expressions, but posture still makes a measurable difference. Gently extend your neck a touch toward the camera without lifting or lowering your chin. This slight forward motion helps define the jawline, reduces the appearance of fullness under the chin, and keeps facial proportions balanced.
Instead of widening your eyes to look alert, softly engage your lower eyelids as if you were giving a subtle, controlled squint. It’s not a smile and not a frown, but just a calm, focused look. This prevents the startled expression.
Pay attention to your jaw as well. Let your teeth rest slightly apart rather than clenching them together. A tight jaw subtly hardens the entire face and can make you appear older or tense. Relaxation reads better on camera, even within strict neutrality.
Preparation that actually shows
What you do the day before can influence how you look on camera. Adequate sleep and proper hydration reduce puffiness and dullness, while limiting salty food can prevent temporary facial swelling.
Grooming should aim for clean and natural. Hair should look fresh and tidy without extreme styling that might cast shadows or distract from facial features.
Clothing matters more than most people expect. Solid colors photograph best because they keep attention on the face. Very light white clothing can blend into a pale background, while extremely dark tones against a white backdrop can create heavy contrast. Simple, balanced choices work best. Religious or medical head coverings are generally allowed under official rules, provided the full face remains clearly visible.
Timing also plays a role. Many people look most rested in the morning, especially after showering and before a long day introduces fatigue or tension.
After you shoot
Once you have a portrait that suits you, use a tool that checks official size and positioning requirements. Online passport photo services can verify compliance and adjust format, without changing your features. That final technical check can make the difference between rejection and approval!
Last Updated: March 3, 2026


