Motion has quietly become the default language of online content. From social feeds to landing pages, still images often struggle to hold attention in spaces designed for movement. Creators feel that shift every day – when a strong photo tells part of the story but lacks the depth or energy needed to fully engage viewers.
That’s where animating a single image starts to make sense. With Artlist’s Image to Video AI, turning a photo into a short, dynamic video doesn’t require editing timelines or technical know-how. It’s a simple, accessible way to add motion, atmosphere, and storytelling power to visuals you already have.
What Does “Photo to Video” Mean in AI Creation?
In AI creation, “photo to video” refers to using artificial intelligence to transform a single still image into a short video by adding motion, depth, and visual continuity. Instead of manually animating elements frame by frame, the AI analyzes the image’s composition, subjects, lighting, and perspective to predict how movement could naturally occur.
It understands context (like foreground versus background) and simulates subtle camera motion, environmental effects, or character movement. Unlike traditional animation, which relies heavily on keyframes and timelines, AI-powered video generation focuses on interpretation and inference, allowing creators to generate cinematic motion from a static image with far less manual effort.
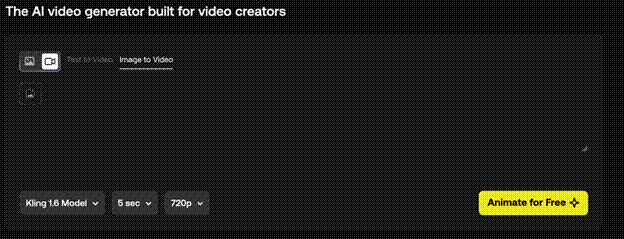
Where to Find Image to Video on Artlist
Image to Video AI lives right where creators expect it. From the homepage header, click AI Video to access the image-to-video tool. Keeping AI tools in the main navigation makes it easy to switch from browsing assets to creating motion without breaking your creative flow.

Step-by-Step: How to Turn a Photo Into a Video With Artlist
Transforming a still image into a moving video with Artlist’s image-to-video tool is relatively simple. Here are the steps involved:
Step 1: Choose Your Image
Start by uploading a new image or selecting one from the My Creations tab. Image to Video supports one image per generation, which helps the AI stay focused on preserving the original composition. For best results, choose images with clear subjects, depth, or lighting. Landscapes, product shots, and cinematic stills tend to translate beautifully into motion.
Step 2: Select Your AI Model
Next, choose your model (Kling, Sora, Veo, etc). Each model affects motion style, realism, and credit usage. Some lean cinematic, others feel more dynamic or stylized. Before generating, you’ll see how many credits the model requires. Keep in mind that Sora 2 and Sora 2 Pro can’t generate videos from images containing people or copyrighted content.
Step 3: Write Your Prompt
Your prompt guides how motion unfolds, says PC Mag. This includes camera movement, atmosphere, subtle environmental shifts. Focus on movement and mood, not changing the scene entirely. Most models support unlimited prompt length, but Kling models cap at 2,500 characters and Seedance V1 Pro at 5,000. Not sure where to begin? Click Suggest Prompt for a solid starting point you can refine.
Step 4: Set Video Parameters
Choose an aspect ratio (16:9, 1:1, or 9:16, depending on the model), select your duration, and pick a resolution (720p or 1080p). Sizes can’t be controlled via the prompt, so make sure these settings match your final platform.
Step 5: Animate and Generate
Click Animate to start. You’ll see credit usage on the button, and generation typically takes 4–8 minutes. While it processes, you’re free to keep browsing or creating elsewhere.
Creative Ways to Use Image to Video
Image to Video opens the door to motion-first storytelling in various genres without starting from scratch.
For social media, animated stills are perfect for eye-catching posts, ads, and reels, according to Explain Visually. A subtle camera push or environmental motion can dramatically boost engagement while keeping visuals on-brand.
On websites, short cinematic loops created from images add polish to landing pages and hero sections. Instead of heavy video shoots, creators can generate lightweight motion visuals that feel intentional and premium.
Mood boards and pitch decks also benefit from motion. Turning static references into short videos helps communicate tone, pacing, and atmosphere more clearly, especially when pitching creative concepts or campaigns.
For music projects and presentations, image-to-video clips work beautifully as background visuals. Gentle movement keeps things visually alive without pulling focus away from the main message.
Even product showcases gain a new layer of depth. Subtle lighting shifts or camera motion can highlight details and textures while preserving the original look of the image.
The common thread across all these use cases? Image to Video lets creators reuse what they already have like photos, renders, frames, and extend their lifespan with motion.
Common Pitfalls to Avoid
Avoid cramming prompts with conflicting instructions. Too many movement cues can confuse the output. Don’t expect full scene transformations; Image to Video enhances what’s already there. Also, be mindful of model restrictions, especially with people or copyrighted content. Choosing the right model upfront prevents wasted credits.
Key Takeaways
Image to Video isn’t about replacing creative decisions. Rather, it’s about extending them. By adding motion while preserving the original look and feel, creators gain flexibility without sacrificing intent. The process stays simple, the controls stay clear, and experimentation feels low-risk. If you already have images you love, Image to Video gives them a second life one frame at a time, in motion.
Last Updated: February 25, 2026


