A cutscene can look good on paper and still drag when somebody watches it. Perhaps the pilot explains too much. Perhaps the camera reveals the threat before the character notices it. Those are useful problems to find while the scene is still a handful of shots, before a team has built the cockpit or rigged its occupant.
Storyboards and animatics give developers that chance. An animatic is a rough edit used to test a scene’s timing. For a small team without much time for drawing, AI video offers another way to put one together.
Google’s Veo 3.1 generates audio alongside video, including dialogue and background sound. That makes it worth considering for cutscene planning: you can hear where a line sits against the action, then decide whether the scene deserves further work.
What Veo 3.1 gives you to work with
Check the settings in the service you plan to use. Veo 3.1 supports text prompts, image-led generation and first-and-last-frame control, but the available combinations depend on the model and interface.
Google’s Gemini API documentation lists four-, six- and eight-second generation, with eight seconds required for 1080p and 4K output. Lite supports up to 1080p. Both landscape 16:9 and portrait 9:16 are available. Reference-image support has its own restrictions, so don’t assume every setting works with every input.
For a first animatic, try allocating the shots this way:
- Standard: dialogue close-ups and moments where the expression matters.
- Fast: chase sequences, vehicles and other shots you expect to revise repeatedly.
- Lite: establishing views, backgrounds and early mood tests.
That’s a sensible starting plan, not a finding from a controlled comparison. Run one representative shot before committing the whole sequence to a tier.
Eight seconds won’t hold a long conversation. It can, however, hold a glance at a warning light or a brief exchange before a cut. Build around those smaller beats.
Three jobs it handles well
The dialogue beat
Put the spoken line in quotation marks and describe the delivery. Is the character frightened, trying to hide it, or simply tired? Add the background sound separately so the request is easy to follow.
Then listen to the result without looking at the picture. Does the line explain something the audience already knows? Is there room for a reaction? A temporary performance can help you ask those questions earlier, though its delivery shouldn’t be mistaken for the best an actor could bring to the scene.
If the voice is distracting, replace it with a scratch recording in the edit. You still have something useful to cut against.
The action shot
A vehicle chase gives you several decisions to test. Where does the camera sit? Can the viewer tell which way the car is moving? Is the obstacle visible before the driver reacts?
Start with one maneuver, such as a turn into a narrow tunnel. Watch for impossible movement or a road that changes shape. An attractive clip can hide poor spatial continuity. For a game introduction, the useful result is a shot that makes the route and the danger clear.
The tone test
Keep the action and framing similar, then change the treatment. Try a worn industrial setting, a brightly colored miniature world or a clay-like stop-motion look.
Compare what each version does for the story. A handmade style might make an otherwise bleak exchange feel funny. A realistic treatment might make the same line seem too theatrical. These are decisions you can explore before commissioning finished art.
A sample prompt for a cutscene beat
Keep the request to one short beat. Describe the framing, character and action, then add lighting and sound. For example:
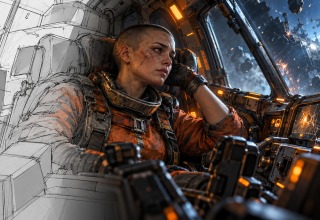
Medium close-up, slow dolly in. A tired salvage pilot in her forties with a shaved head and a scratched orange flight suit sits in a cramped cockpit lit by flickering amber warning lights. She taps a cracked display, exhales, and says flatly: "Fuel for one jump. Make it count." Rain of sparks behind the canopy glass, 35mm lens, heavy film grain. Sound: alarm chime, creaking hull, low engine hum. No subtitles.
Treat "No subtitles" as an instruction to the model, not a guarantee. Check the returned footage for unwanted text. And if the pilot rushes through the line, simplify the action before adding more directions to the prompt.
Building a sequence from single shots
An animatic needs an edit. Several impressive clips sitting in a folder won’t tell you whether the scene works.
- Write a shot list with one main action per shot. Add what the audience needs to learn from it.
- Generate a rough version of each shot, using the tier choices above as a starting point.
- Use your own concept art as a start image if it already exists. Text prompts are enough to begin when it doesn’t.
- Carry a usable end frame into the next shot where that helps continuity. For a new camera angle, check the eyeline and screen direction yourself.
- Assemble the clips with temporary sound. Trim them freely; you don’t have to use every generated second.
- Watch the whole scene, note where attention drops and revise the shot list.
Before generating, compare the current options on PixelDojo, which publishes example prompts and tier prices. Its listed eight-second 1080p clips cost 96 credits on Standard with audio, 36 on Fast with audio and 16 on Lite. Example tiles can show sale prices, so check the generation screen for the actual charge.
Budget for retries as well as the first attempt. A cheap shot that needs six attempts can cost more than the one you accept immediately.
Where it falls short, and the rules to follow
Check continuity across every cut. Faces, clothing and props may change between generations; reference images can help, but you still need to inspect the sequence. Look closely at hands, small text and interactions between characters.
The result is also a video, not an editable game scene. It won’t give you a rig, a camera track or a playable level. Once the timing feels right, test essential staging in a rough engine scene, especially where the cinematic hands control back to the player.
Use original characters and reference material you have permission to upload. Before carrying generated footage into a release, review the service terms and the destination’s current requirements. Steam’s Content Survey focuses its AI disclosure on generated content shipped with the game and consumed by players, distinguishing that from tools used for efficiency behind the scenes.
The useful question at the end of the animatic is simple: what should the team build? If the edit tells you to drop two shots and shorten the pilot’s speech, it has already done a worthwhile job.
Last Updated: October 5, 2026