One of the most frequently asked questions by iPhone users is how to transfer photos and videos to Mac. Maybe it’s because it frees up more iPhone storage space, or iCloud space. Or maybe it’s because you want to back up these precious data.
No matter what reason you want to transfer photos or videos from iPhone to Mac, here you can find the right methods. Following we will show you how to do the job with 5 simple ways, and 4 of them are official ways. Let’s check it now.
- Transfer iPhone Photos to Mac with Airdrop
- Transfer iPhone Photos to Mac with MacX MediaTrans
- Transfer iPhone Photos to Mac with Photos App
- Transfer iPhone Photos to Mac with iCloud
- Transfer iPhone Photos to Mac with iTunes
Method 1. Transfer Photos from iPhone to Mac Using AirDrop
Airdrop allows to send documents, websites, contacts, photos, and videos between iPhones and more from one Airdrop-supported device to another wirelessly. It’s a great way to immediately transfer large files from one Apple device to another. Airdrops work over Bluetooth, so both the sending and receiving devices must have Bluetooth turned on.
Airdrop requires Wi-Fi and Bluetooth to start sharing data, you need to make sure that both of the devices are within the Wi-Fi and Bluetooth range. If you are ready to begin, read on to see how to Airdrop from iPhone to iPhone with ease.
Firstly, you need to enable Bluetooth, Wi-Fi, or even if you have a personal hotspot on, and Airdrop on both of your iDevice and Mac. Then follow the steps below to done the job:
Step 1 – Initiate Airdrop on your iPhones
- Swipe up/down from the top/bottom of your iPhone screen to open “Control Center”.
- In the Control Center, turn on Bluetooth and Wi-Fi on one and the other. Then allow Airdrop and choose “Contacts only” or “Everyone”.
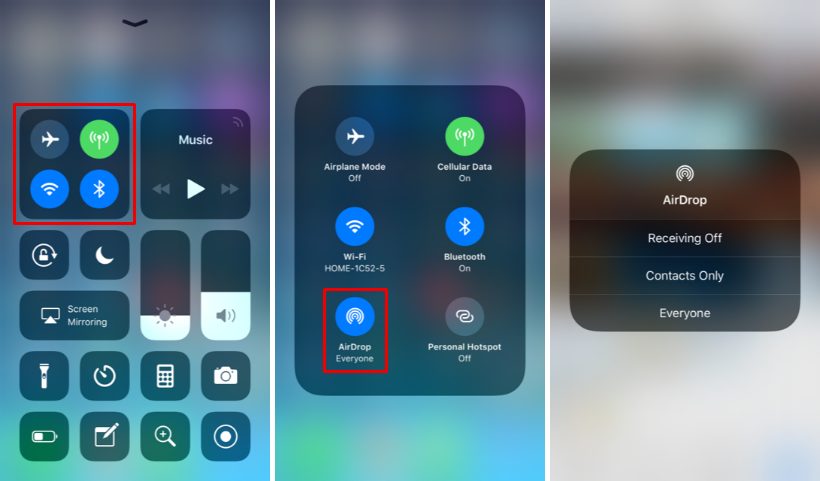
Step 2 – Switch AirDrop on your Mac
- Open “Finder” on your Mac, then click “Go” in the menu bar and select AirDrop.
- A window will open with the AirDrop icon at the bottom, just click on it and select “Everyone”.

Step 3. Transfer photos from iPhone to Mac using Airdrop:
- Go to the Photos app, and choose the photos that you want to transfer,
- Tap the “Share” button, and choose “Airdrop” and the target device.
- Latterly, tap “Accept” in the prompt on your Mac to begin the photos sharing.
For more information on AirDrop, see this guide here.
Method 2 – Transfer Photos from iPhone to Mac Using Photos App
The Photos is where all the photos and videos you take with your iPhone. It can be one of the most traditional ways to transfer photos to Mac OS (https://www.macxdvd.com/mobile/transfer-photos-from-iphone-to-mac.htm).
Step 1. Connect your iPhone to your Mac with a USB cable. Then, open the “Photos” app on your Mac.
Step 2. An Import screen with all the photos and videos that are on your iPhone will appear.
Step 3. Unlock your iPhone, and tap “Trust” when a “Trust This Computer” notification shows.
Step 4. Tap Click “Import Selected” to transfer the photos you prefer. You can also click “Import All New Photos” to transfer your entire Camera Roll.

Method 3 – Transfer Photos from iPhone to Mac Using MacX MediaTrans
If you want a simpler yet more efficient way to transfer photos from iPhone to Mac, I recommend MacX MediaTrans. Why did I propose you use MacX MediaTrans instead of the built-in feature?
MacX MediaTrans Overview
MacX MediaTrans is application software of iPhone file manager mainly designed for MacBook Air/Pro/Mac 4K/5K etc. iPhone transfer software to construct easy to transfer photos, videos, movies, music, TV shows, etc. between iPhone, iPad, and Mac computers. Plug-and-transfer solution keeps secure and quick iPhone transfer for data in batches and large sizes.
Advantages of MacX MediaTrans
- It is a much quicker way to transfer up to 100 photos in 4K quality in 8 seconds. You will obtain storage space since it allows you to compress the files without quality loss.
- Just 2 clicks to finish the entire transferring process.
- You can delete videos and photos from your iPhone, something you can’t do with iCloud or iTunes backup.
- You can use your iPhone as if it were a Pen drive to carry information.
- All this and more, no storage limit, no format limit, and no device limit.
- Compatible well with all Mac OS, including Macbook Pro/Air, iMac, Mac Mini or iMac Pro, etc.
For all of these reasons, it is easy to think that MacX MediaTrans is the best alternative to iTunes and iCloud to backup and transfer videos, music, photos, etc. between iPhone, iPad, iPod touch, and Mac. Now, let’s see the detailed steps about transferring iPhone photos to Mac with MacX MediaTrans.
Step 1. Download MediaTrans on your Mac, then connect your iPhone to Mac via a USB cable.
Step 2. Click the “Photo” icon to get the photos in your iPhone, then select the photos you want to transfer to your Mac (directly drag-drop supported). Then the photos will be saved on your Mac.
Note:
- To transfer all photos: To transfer all photos in one stroke, click Export and there is an option of Select All, click it.
- To transfer photos selectively: Choose the photos you prefer, select with Ctrl pressed and click Export.
Method 4 – Transfer Photos from iPhone to Mac Using iCloud
iCloud stores your photos, passwords, notes, files, and other data in the cloud, this is where all your Apple stuff is automatically stored. And following are the steps to transfer photos to Mac using iCloud.
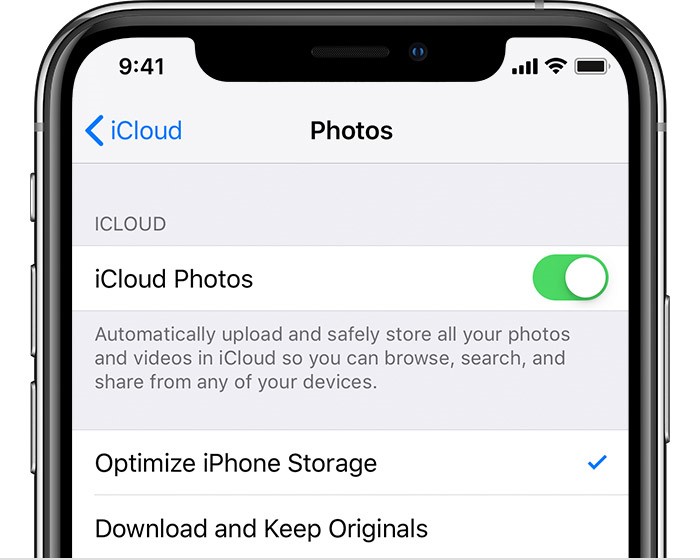
Step 1. Set up iCloud Photo Library on our iPhone: Go to “Settings” > Tap on [your name] at the top > Go to “iCloud” > Tap on “Photos” > Switch on “iCloud Photos”.
Step 2. Set up iCloud Photo Library on our Mac: Launch the “Photos” app > Go to the Photos menu in the menu bar > Click on “Preferences” > Click on “iCloud” > Check the box next to iCloud Photo Library. P.S. Check iCloud Photos in macOS Mojave.

Method 5 – Transfer Photos from iPhone to Mac Using iTunes
Apple has designed iTunes as an all-in-one software for managing iOS as a single multimedia suite for all your Apple device needs, iTunes can easily transfer iPhone photos and videos to laptops without any hassle. If your iPhone has images that are not on your computer, you can follow these steps to import them to your Mac:
Step 1. Make sure your computer has the latest version of iTunes. You need iTunes 12.5.1 or later to import photos. Launch iTunes first (more info).
Step 2. Connect your iPhone to Mac using the original iPhone USB cable. You may need to unlock your iPhone using the screen passcode and then click “Trust this computer” if such a window pops up.
Step 3. Click your device icon on the iTunes top bar.
Step 4. Look at the left side of iTunes Windows and click on Images.
Step 5. Check the box next to “Sync images,” and select the folder or app from which to sync.
Step 6. Select “Sync all photos and albums”. You can select “Add Videos” to add your iPhone videos to the sync.S
Step 7. On your laptop, click the “Start” menu and then select Photos to open the “Photos” app.
Step 8. Select “Import> From a USB Device”, select your iPhone, then follow the instructions. You can select the items you want to import and choose where to store them. Allow a few moments for detection and transfer.
Last Updated: February 25, 2022


