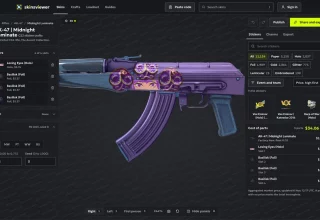
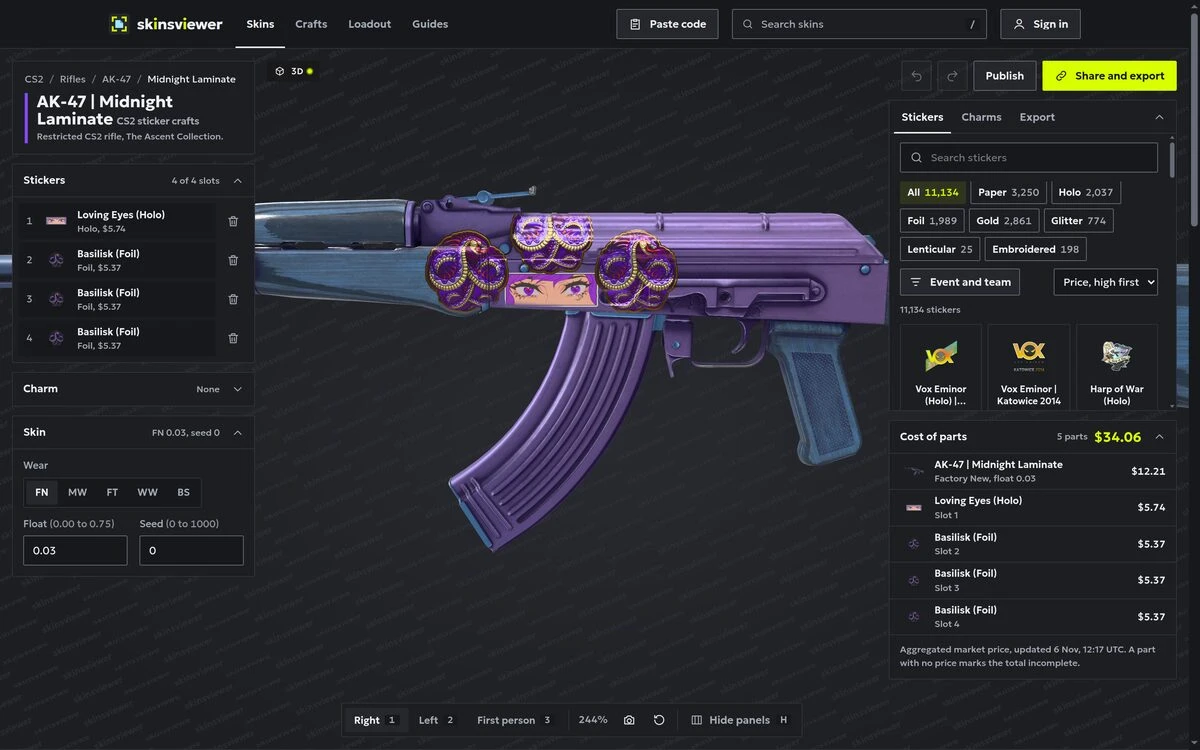
Three snake stickers and two eyes atop the AK-47 create a face that isn’t part of the original skin. This kind of creative styling was difficult when stickers could only be placed in four fixed spots. Valve introduced A Call to Arms on 6 February 2024. It allowed up to five stickers and let players move and rotate them in the designated area. You can also zoom in when adding stickers.
A CS2 sticker craft is a skin with stickers arranged into a design. The costly element of making a sticker craft is the Apply button. A sticker will remain attached to your gun until it is removed, so plan your sticker arrangement, scrape level and cost of stickers in advance.
What happens when you apply a sticker?
After you confirm the placement, the sticker is used up. If you change your mind, you can scrape the sticker away or remove it immediately. In both cases the sticker is lost. The Armory update added features to control the stickers including selecting a scrape level when adding a new sticker. Once you have applied a sticker, you can only increase the amount of wear.
You can always swap a skin out of your loadout. An applied sticker stays where you put it. If you position an eye slightly to the left, changing it requires using another copy and beginning again.
1. Evaluating stickers based on their icon in the inventory
A sticker may fill the entire square on the market page and still look quite small on a rifle receiver. Finishes such as holo, foil, and lenticular also change depending on the direction of the gun. A holo may show one colour in the icon and another when you see it in game.
Try choosing two colours already on the skin. The M4A4 Temukau has plenty of orange and blue to begin with. Against the dark AK-47 Midnight Laminate, gold and foil can stand out where a low-contrast paper sticker gets lost. Turn the actual model in the preview to see how the design changes with the light.
2. Treating placement as secondary
Slide a sticker a little and it can frame the gun’s artwork. Slide it the other way and it can cover the detail you bought the skin for. Turn a sticker 15 degrees and four copies could read as one stripe. Even though these stickers are relatively affordable, their placement does a lot of the work.
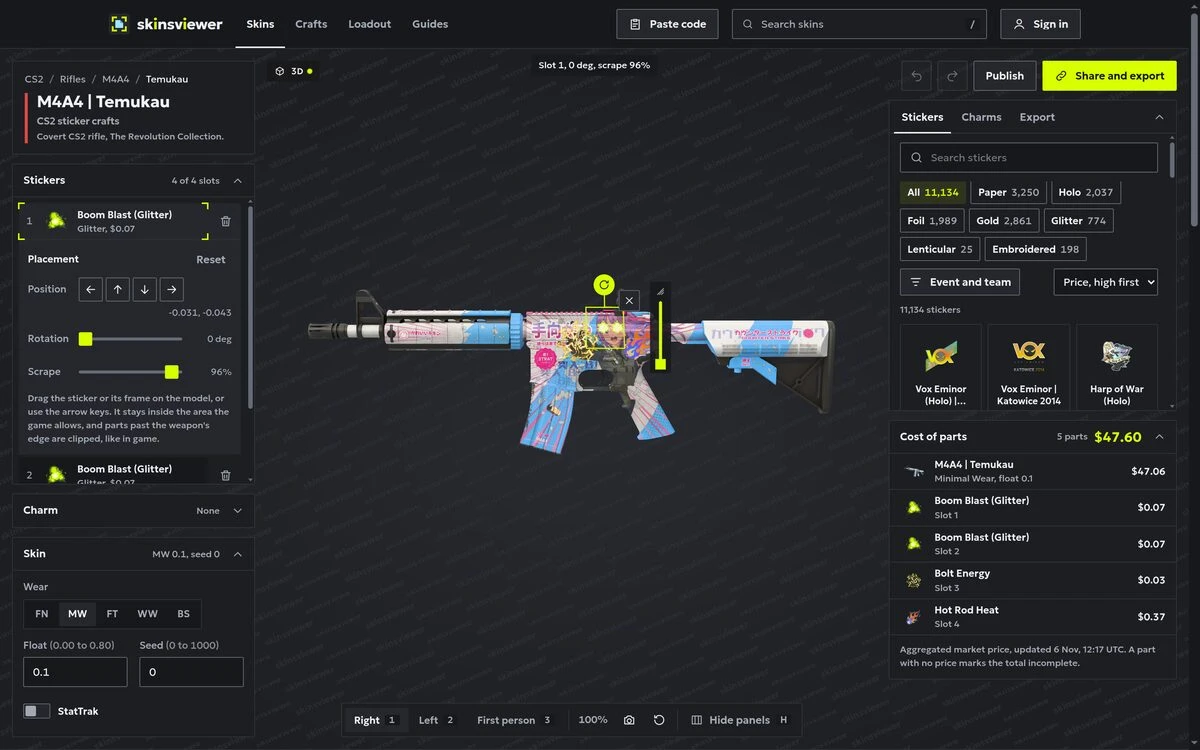
Examine the Temukau’s face first. The two glitter blasts were scraped to become pools of light over the eyes. Bolt Energy and Hot Rod Heat sit in the hands and look like they belong in the skin’s artwork. If you put any of the four back in a default spot, the effect would disappear.
- Provide space for the artwork. If the skin includes a face or some central theme, decide what you’d like to keep visible before adding stickers.
- Check the side with the design. Examine it in the inspect view and then switch to first person to see how much of it shows while playing.
3. Testing scrape levels on a sticker you’ve applied
Partially scraping a sticker can make it appear duller or leave just enough of a detail to light up an eye on the Temukau. There isn’t a consistent amount of degradation as you scrape. Compare how little changes in the first two frames with what happens in the last two.

At 50% scrape, Ruby Wave remains largely intact. At approximately 70% scrape, it begins breaking apart quickly. Depending on the type of sticker, the art may wear away in different areas at the same setting. Set the placement and rotation in your preview and test a few scrape settings. When applying a new sticker, set the scrape level on the application screen before you confirm. After having applied a sticker, review your preview before increasing wear.
4. Counting the sticker price once when you need four
First, budget for the skin at its intended wear and add every sticker required. If your craft uses four identical stickers, multiply the base price by four. The table provides pricing if you were to purchase individual components using the builder’s price snapshot from 6 November 2026 in US dollars.
| Craft | Skin | Skin price | Stickers | Sticker total | Craft total |
|---|---|---|---|---|---|
| Power Up | M4A4 Temukau (Minimal Wear) | $47.06 | 2x Boom Blast (Glitter), Bolt Energy, Hot Rod Heat | $0.54 | $47.60 |
| Medusa | AK-47 Midnight Laminate (Factory New) | $12.21 | Loving Eyes (Holo), 3x Basilisk (Foil) | $21.85 | $34.06 |
| Lotus Glaze | AK-47 Inheritance (Factory New) | $86.68 | 4x Lotus (Glitter) | $24.40 | $111.08 |
| Great Wave | AK-47 Inheritance (Factory New) | $86.68 | 4x Great Wave (Foil) | $52.40 | $139.08 |
Both Inheritance crafts started with the same skin. Changing all four stickers increased the sticker expense from $24.40 to $52.40. Most of the cost on the cheaper Midnight Laminate came from the stickers alone. Since you likely already own a skin, try it first. Power Up only used $0.54 worth of stickers.
Review your preview at the exact wear you intend to purchase. A Factory New skin can look quite different under the same stickers from a Field-Tested copy. They can have very different prices, too. Before purchasing your parts, review current listings. Critical Hit also has a guide to how CS2 bot trades and peer-to-peer marketplaces work.
5. Assuming a gen command shows your exact craft
You can preview your craft in the game with an inspect link or a gen command on a community server. The difference is where the stickers land.
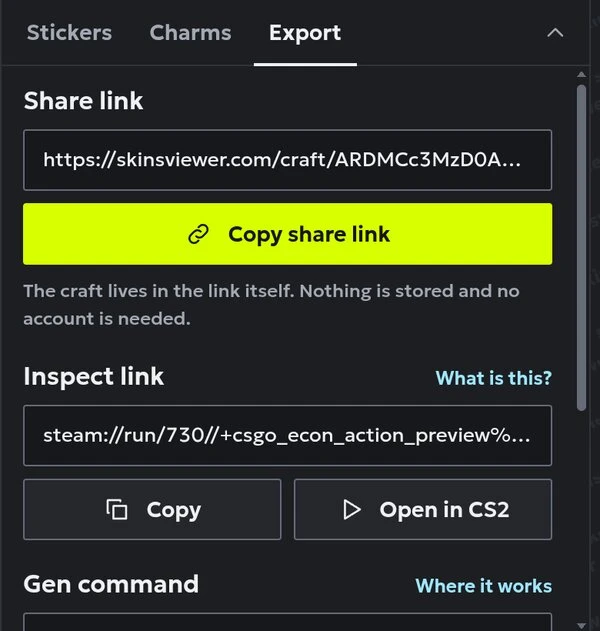
- Inspect link. The builder’s inspect link carries the sticker positions, rotations and scrape values. Open it on a computer with CS2 installed through Steam to see the gun in the game’s inspect view without needing to join a server.
- Gen command. The gen command is compatible with community servers that support it. It carries the skin and the stickers’ scrape values. It uses the default sticker spots and leaves out custom rotation and StatTrak.
If you took time arranging two eyes on a Temukau, open an inspect link before buying the parts. This is the preview that keeps the stickers where you put them.
Planning a CS2 sticker craft before you purchase
- Choose a skin and wear level. Begin with the gun you want to use and a finish that fits your budget.
- Try stickers on the gun. Choose colours from the skin and see how the finishes react to light as you turn the model.
- Set the position and rotation. Check whether you’re hiding parts of the skin you want to see.
- Decide on a scrape level. Note the setting you want for each sticker.
- Calculate the total cost. Include the skin at the chosen wear and every sticker copy.
- Open the inspect link in CS2. Check the placement one last time before buying the parts.
- Apply the stickers in game. Use the placement screen’s zoom and rotation. Verify the position and planned scrape level before confirming each sticker.
You can do steps 1 to 6 for free in a browser. SkinsViewer is a CS2 sticker craft builder with a 3D view of the gun. Drag, rotate and scrape the stickers and the parts total updates as you go. Upon completion, the builder offers an inspect link or gen command so you can check your work.
Quick answers about CS2 stickers
Can you remove a sticker in CS2 without losing it? A sticker applied directly to a weapon is destroyed when you remove it. A Sticker Slab is a charm that keeps the sticker sealed. Break the slab and the sealed sticker goes back into your inventory.
How many stickers can a CS2 weapon have? Up to five on weapons that accept stickers. You can choose the placement and angle within the game’s placement area. Knives and gloves don’t support stickers.
Will scraping a sticker reduce its value? It depends on what buyers will pay for the whole skin with its stickers. A deliberate scrape can be part of the design. Once you’ve scraped an applied sticker, you can’t undo the wear or sell the sticker on its own.
What’s a cheap way to make a good sticker craft? Begin with a skin you already own. Try lining up several low-priced stickers before exploring rarer ones. The eyes in Power Up show what you can do with about half a dollar in stickers.
Last Updated: November 9, 2026