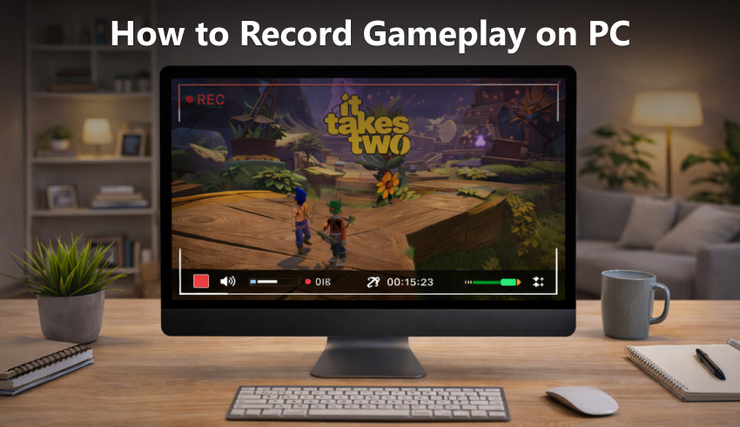
Recording the gameplay has become one of the essential skills for many gamers or streamers. You might want to show off the exciting moment of defeating a super boss on YouTube, or you might consider creating a channel dedicated to making game reviews and guides. Or you could be a dedicated game tutorial blogger, specifically recording game strategies to help other players complete the game more easily. Whatever the goal, knowing how to record gameplay on PC becomes incredibly useful.
However, when you first try to record gameplay, you may quickly run into questions like this: How to record gameplay for YouTube on PC? Which gameplay recorder is easy for beginners?
In this guide, we’ll show you three excellent gameplay recorders for PC, helping you choose the one that best fits your needs.
Method 1: Record Gameplay with AVAide Screen Recorder
Want to share your epic gaming moments on YouTube or TikTok in high quality? AVAide Screen Recorder is the perfect tool to meet all your needs. With its versatile modes, it allows you to capture games, videos, windows, and more on-screen activities in high quality with no lag! Compatible with both Windows and macOS, AVAide Screen Recorder can record gameplay with a webcam simultaneously, making it an ideal choice for content creators.
This software doesn’t support live streaming to other platforms, such as YouTube or Twitch. Moreover, the free version has several limitations, which may prevent users from accessing some advanced recording features.
Key Features of AVAide Screen Recorder
- Capture crystal-clear recordings up to 4K resolution at 60 FPS.
- Add text, images, or annotations to highlight key moments while recording.
- Provide various output formats and built-in converting/editing tools for easy customization.
- Record audio from computer with noise cancellation and microphone enhancement.
How to Record Gameplay on PC with AVAide Screen Recorder
Step 1: Launch AVAide Screen Recorder and select Game Recorder in the top left corner. Then open the game you want to capture. Then you can click Select Game and select the specific game window you want to capture.
If you want to include your reactions or commentary, you can also turn on Webcam and Microphone to record face-cam and voice at the same time.

Step 2: Click Preferences to customize your recording settings. It is recommended to set the Frame Rate to 60 FPS and choose Lossless Quality. After adjusting the settings, click OK to save your changes.
Step 3: Click the REC button to start recording your game on PC. When you finish recording, click the Stop button. You can then preview or edit the video before saving it. Finally, click Save to export the recorded gameplay to your computer.
Method 2: Record Gameplay with Windows Xbox Game Bar
If you’re looking to capture short gameplay clips and share them with friends, Xbox Game Bar is a convenient tool for casual recording. It is built directly into Windows 10/11, allowing users to quickly record games on PC using keyboard shortcuts.
However, it does have some limitations. It cannot record your webcams, and the quality of the video may not meet the standards of users who require crisp, high-resolution recordings. While it offers basic features, it lacks advanced recording settings.
Key Features of Windows Xbox Game Bar
- Pre-installed on Windows 10/11, no download required.
- Completely free to use and extremely user-friendly for beginners.
- Supports customizing save location, recording quality, and hotkeys.
- Monitor your CPU performance in real time while recording.
How to Record Gameplay on PC with Xbox Game Bar:
Step 1: Open Start Menu, type Xbox in the search box, or press Windows + G on your keyboard to open the Xbox Game Bar.
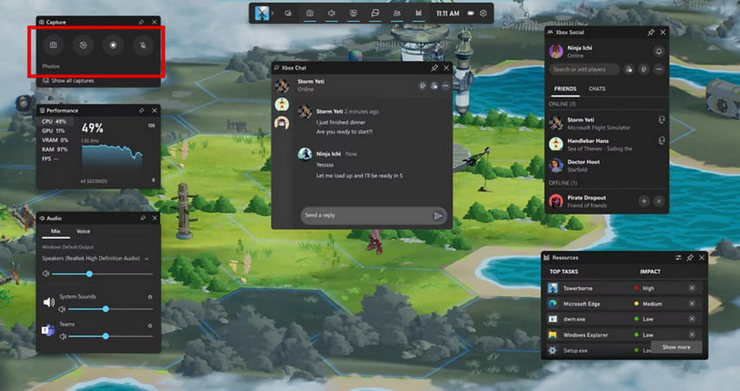
Step 2: Click the red Start Recording button, or press Windows + Alt + R to begin recording. To capture screenshots during recording, click the Camera button in the Game Bar or press Windows + Alt + PrtScm.
Step 3: When you’re finished, press Windows + G to open the Game Bar, and click the Stop Recording button in red. Your recording will automatically be saved in a local folder.
Method 3: Record Gameplay with OBS Studio
OBS Studio (Open Broadcast Software) is free and open-source and widely used by gamers, YouTubers, and streamers. It allows users to record gameplay on Windows, macOS, and Linux seamlessly. It provides advanced recording settings and high customization options. In addition to recording, OBS Studio also supports live streaming to external platforms, such as YouTube, Facebook, and Twitch.
However, OBS Studio requires more system resources compared to other recording tools, which can have an impact on CPU performance, especially on lower-end systems. The complicated interface may be not brginner-friendly.
Key Features of Windows OBS Studio
- Free and open-source recording software is available to anyone.
- Provide extensive settings, plugins, scenes, and overlays for flexible recording.
- Supports streaming to multiple platforms like Twitch, YouTube, Facebook, and more.
- Features a powerful audio mixer and studio mode for audio control.
How to Record Gameplay on PC with OBS Studio:
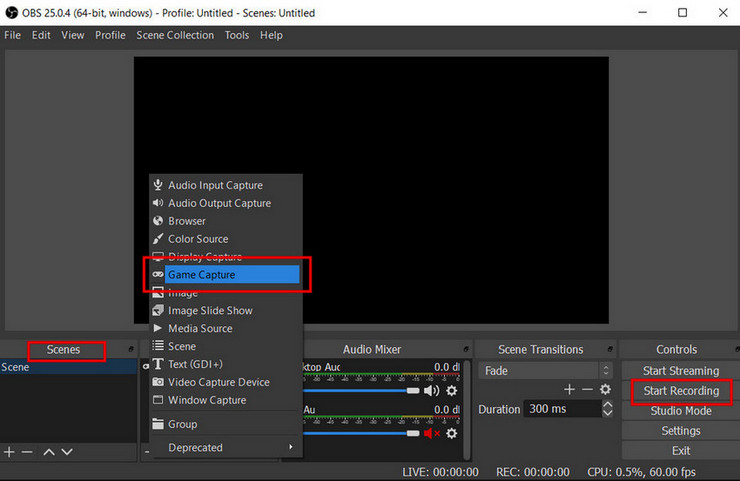
Step 1: In the Scenes panel, click the + (Add) button to create a new scene, then give it a name. Scenes help organize what you want to capture during recording.
Step 2: Go to the Sources panel and click the + (Add) button. Select Game Capture, then create a new source and select the game window you want to record.
Step 3: Open Settings > Audio to make sure both Microphone and Desktop Audio are turned on. You can also adjust other recording settings if necessary.
Step 4: Launch your game, then click Start Recording in the Controls panel to begin capturing the game on Windows. When you’re done, click Stop Recording to finish and save the recordings.
Note: For better recording quality and performance, you may also need to configure advanced settings such as bitrate (8,000-20,000 kbps), encoder (NVENC or x264), and keyframe interval (2 seconds).
Tips for Recording Gameplay on PC
- Close any unnecessary background apps so your system can run more smoothly.
- Save game recordings to an SSD for faster and more stable data writing.
- Check if the game sound and your voice are clear.
- Keep your graphics drivers up to date to prevent potential performance issues.
- Adjust bitrate, resolution, and frame rate to balance video quality and performance based on the type of game you’re playing.
Key Takeaways
Recording gameplay on PC can be simple as long as you choose the right tool for your needs.
- AVAide Screen Recorder – An easy tool for gameplay recording with a webcam.
- Xbox Game Bar – The best built-in option for quickly recording gameplay clips on Windows.
- OBS Studio – Ideal for advanced recording and live streaming.
With these gameplay recorders, capturing your best gaming moments becomes much easier. Pick one that fits your needs and start saving your highlights to share with others!
Last Updated: March 19, 2026


